Effective Templating with Helma
From a frontend developer’s perspective
Helma reading list:
The following is not intended for Helma beginners - you should already know yourself around the typical Helma application structure to understand what I’ll explain. But since Helma was developed to be easy and fast comprehendable I recommend to take some time and read into the documentation. To the left you find some starting points.
With Helma Version 1.6 several new and nice features where added to the Templating mechanisms, for example „Deep Macro Invocation“. If you follow the link you can read about them from a technical perspective. I’m going to tackle the topic from a different angle - the view of a frontend developer looking for the best way how to implement a templating system for a website.
Imagine you want to build a Website using a layout as depicted in Figure 1:
- A top navigation with the 3 main channels (orange).
- Below that the page content consisting of an image and some text.
- To the right a channel specific subnavigation (yellow, green, and blue).
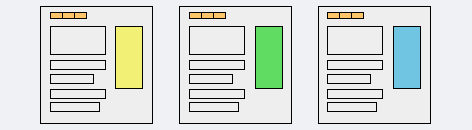 Figure 1:Website layout with a top navigation and 3 different channels
For the sake of the story let’s call the 3 channels sports (yellow), nature (green) and movies (blue). Users switch between channels through the top navigation. Within each channel the subnavigation on the side changes to reflect channel specific items inside.
Simplifying the Template
Of course we could maintain a different template for every channel but that would not be very clever regarding maintainablity. So we want to transform the 3 templates as depicted in Figure 2:
We use a single template for the Website layout. The contents of the channel navigation (Figure 2 (a)) are fetched directly from the database so that changes go online immediatly (without editing the skin). The subnavigation for each channel (Figure 2 (b)) is fetched from a channel specific skin by examing the url we are rendering.
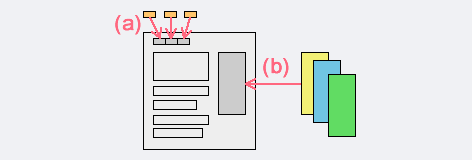 Figure 2: Website layout transformed into a template-set.
That pattern looks promising so lets see how we implement that in helma.
Skins and res.skinpath
In Helma each Prototype has it’s own set of skins. A skin is a file with extension .skin inside the directory which defines the Prototype. So on the inside whenever you want Helma to render a skin it looks through the Prototype’s directory for the file matching the skin name.
And that is where a variable named res.skinpath comes in handy. During the processing of the request you can put an array there containg paths to directories. Helma then tries to find a matching skin in these paths before using the default path which is the Prototype directory.
Application structure
To use that mechanism to our advantage we need to structure the application for our website example accordingly: Let’s think of the 3 different channels as instances of a Prototype named Channel. All available channels are mounted in a property channels of the Application’s Root object. That way they are automatically available via an URL because of Helmas Prototype-to-URL mapping. For example as:
- helma.org/channels/sports
- helma.org/channels/nature
- helma.org/channels/movies
Each Channel has a different skinpath which is stored in the database:
- Channel „sports“: C:\skins\sports\
- Channel „nature“: C:\skins\nature\
- Channel „movies“: C:\skins\movies\
The general layout which is common for every channel resides directly in the Prototype directory, let’s say as Layout.skin . That way every Channel shares that layout. Inside this common layout file we find the static HTML code as well as the macros rendering the dynamic parts.
We put the channel specifc subnavigation in a file called Subnav.skin inside every directory as defined by the skinpath of the channel. So we end up with 3 different files:
- C:\skins\sports\Channel\Subnav.skin
- C:\skins\nature\Channel\Subnav.skin
- C:\skins\movies\Channel\Subnav.skin
The render Macro
Since the subnavigation is a dynamic part we use the render macro (part of Helma’s core library) inside the Layout.skin.
The render macro is called in context of the Channel object which is in the URL. So it fetches that Prototype’s Subnav.skin contents and puts them where it is called (in the Layout.skin). Now the trick is to extend res.skinpath with the proper directory path for the currently displayed Channel. So at the beginning of the request (for example in the main_action) we add the Channel specific skinpath from the database to res.skinpath. Let’s assume we put the skinpath into the property Channel.extendSkinPath, then the code could look like:
This pattern allows us to modularize parts of the general Layout into more specific skins.
The Network Navigation
The second requirement for the Website skin ist that the links in the network navigation are not hardcoded as HTML. This way a user can edit a channel (title, url) in the backend and the changes go online immediatly.
A natural approach would be to write a special helper macro which renders the network navigation. We try to avoid writing special macros whenever possible since it adds unnecessary complexity to the app and makes the skin harder to understand. In this case we can make use of Helma’s Deep Macro Invocation instead.
As explained earlier all channels are accessible via the property Root.channels. A feature of Helma is that inside a skin you can reference every object which is in the URL when the skin is rendered. As the Root object is always there we should be able to directly call the properties of a specific channel:
I wrote should since that does not work out of the box due to security considerations. In order to make it work you need to implement the function getMacroHandler on your own. Let’s enable the pattern for every Prototype and implement the function for HopObject (which every Prototype is derived from):
return this[name] || this.get(name);
};
Once this function is in place you can directly access properties, objects and macros from deep within your Application structure. Thus the name „Deep Macro Invocation“. But be aware of the security implications!
In Figure 3 the patterns used to implement the template in Helma are illustrated.
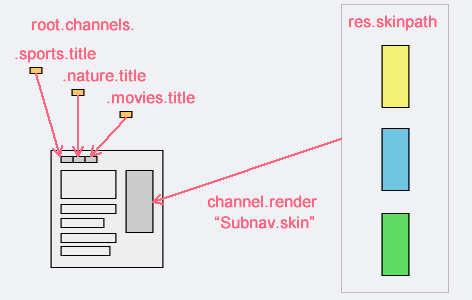 Figure 3: Template implemented using Helma patterns
Summing it up
The example I used is fairly common for a webdeveloper and can be implemented in many different ways. The advantage of using the patterns illustrated in this article are the minimal amount of code used, the good readability as well as the low maintaibility of the created skin. The template was modularized making use of res.skinpath in combination with the render macro. Data from outside the URL context was fetched using getMacroHandler .
Marius Lessiak,